Writing in WordPress used to feel like typing in a plain text box. It was simple but limited. That changed when Gutenberg came to WordPress 5.0. It introduced the block editor.
Now, every part of a page is a block. A paragraph, an image, or a button, each works like a piece you can move and reuse. This makes it easier to design pages, keep styles the same, and give teams better tools to build with.
WordPress still powers a huge part of the internet. About 43 out of every 100 websites run on it. So, learning how to build blocks is worth it. Blocks save time, make writing smoother, and keep websites looking consistent.
What Are WordPress Content Blocks and How Do They Work
Blocks are the atomic units of content in Gutenberg. Each block isolates markup, data, and editor behavior. A paragraph, a gallery, a call to action, or a custom widget can be a block.
Blocks have editor code and front-end output. They can be static or dynamic. They can accept attributes like text, colors, and images.
The block model makes drag & drop on WordPress straightforward. It also lets developers build reusable elements that fit into any theme or plugin.
For many teams, this is where the challenge begins. Building a block that works well across themes, handles custom styles, and stays easy for editors takes skill.
That is why businesses turn to Pure Website Design. We are trusted as the best WordPress developers, creating blocks that are reliable, scalable, and tailored to each site.
Why Build a Custom WordPress Block
Core blocks cover many needs. They also leave gaps. Default blocks rarely match a brand’s exact UI or a product team’s workflow. You should build a custom WordPress block when you need specific behavior.
Use cases include a branded Call to Action, a product card for WordPress ecommerce plugins, or a complex layout tied to your CMS fields.
Custom blocks bring four concrete benefits. First, they give consistent output across posts. Second, they speed authoring when content editors use prebuilt controls. Third, they make functionality reusable without extra training. Fourth, they keep branding intact across the site.
Don’t build a block for every small tweak. Reusable blocks and patterns often solve simple needs. Choose custom blocks for repeatable components, or when you must extend WordPress with custom functionality.
When you get stuck, go to Pure Website Design. We are the trusted WordPress developers who help teams ship blocks and integrate them into themes and plugins.
What You Need Before You Begin Block Development
Prepare a stable local WordPress environment. Use a tool such as Local, Docker, or a local LAMP stack. Install a recent WordPress version. Install the Gutenberg plugin only when you want bleeding-edge editor features on older installs.
Install Node.js and npm on your machine. Modern block tooling relies on these. The official @wordpress/create-block package requires Node and npm to scaffold code and run the build scripts.
Pick a code editor you like. VS Code works well. Use a browser that supports modern dev tools. Keep Git for version control. That setup keeps your work repeatable and safe.
How to Scaffold Your First Block With @wordpress/Create-Block
Scaffolding removes boilerplate. Run this from a terminal inside your WordPress plugins folder.
npx @wordpress/create-block my-first-block
The command produces a plugin folder. It wires up PHP, JavaScript, and styles. It also creates a modern build pipeline powered by wp-scripts. Use the interactive flags if you want to customize the name or namespace.
Generated files you will see:
- block.json — block metadata and asset references.
- plugin.php or a PHP bootstrap — registers the block on the server.
- src/index.js — editor code that registers the block client-side.
- src/edit.js and src/save.js — editor UI and saved markup.
- style.css and editor.css — front-end and editor styles.
The scaffold gives you a working block. Edit the code and run npm start to watch files while you work. Use npm run build to produce production assets.
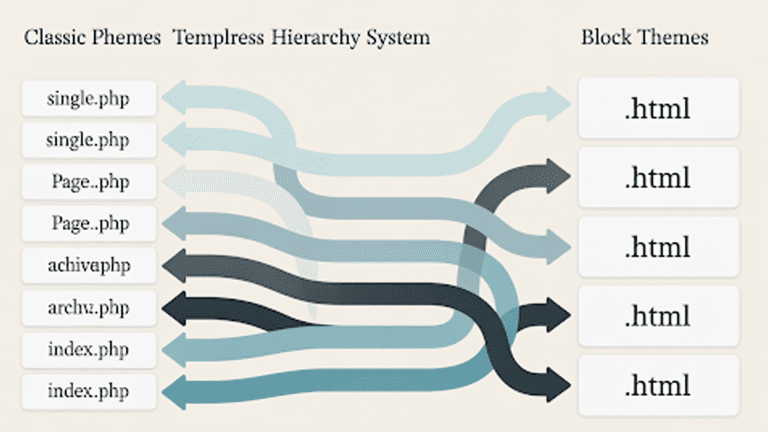
How Does WordPress Recognize and Register Your Block
WordPress uses both server and client registration. The canonical metadata file is block.json. Since WordPress 5.8, block.json is the recommended single source of truth for block metadata.
It stores name, title, category, attributes, and asset handles. When you call the PHP helper register_block_type() or place the folder in a theme or plugin, WordPress reads block.json and wires scripts and styles automatically.
Client-side registration uses registerBlockType() from the @wordpress/blocks package. That function links your edit and save implementations to a block name. The client-side settings control editor behavior, controls, and the saved markup.
How to Edit and Customize Your Block Beyond the Scaffold
Open src/edit.js. This is the edit function that defines what editors see. Use short React components. Keep the edit logic focused. Store editable values in block attributes.
Add attributes in block.json. Typical attributes include strings, numbers, booleans, and objects. Use supports to enable alignments or custom class names.
Create a simple “Call to Action” example:
- Attribute: ctaText (string).
- Attribute: ctaUrl (string).
- Attribute: backgroundColor (string).
In edit, render controls for those attributes. Use built-in components such as TextControl, URLInput, and PanelColorSettings. Use InnerBlocks when you want nested content or drag & drop on WordPress flows inside the block.
In save, return static markup when possible. That keeps blocks fast. Use server-side rendering for dynamic content like product prices or query-driven lists, especially for WordPress ecommerce plugins that need live data.
Keep styles modular. Use editor.css for editor-only rules and style.css for front-end styles. Avoid heavy scripts in the front end to protect performance.
How to Test Your Block in the Gutenberg Editor
Activate the scaffolded plugin on your local site. Create a new post or page. Insert your block from the inserter. Edit attributes. Save and preview.
Troubleshoot common errors:
- Block not appearing: check the block name and block.json path.
- JavaScript console errors: run npm start and watch the terminal for compile errors.
- Missing styles: confirm asset handles loaded in block.json and that the plugin is active.
Test responsive behavior. Test accessibility. Check keyboard navigation and ARIA attributes. Test with a real content editor, not just a developer account. That reveals UX issues you will not catch alone.
What Coding Standards and Practices Protect Your Work
Write modular code. Break components into small functions. Export and import cleanly. Use WordPress coding standards in PHP and follow ESNext patterns for JavaScript. Keep attributes serializable so data remains portable.
Accessibility matters. Use semantic HTML and label controls. Validate color contrast for customColor picks. Use useBlockProps() to keep classes consistent between editor and front end.
Aim for performance. Avoid embedding heavy libraries in every block. Lazy load scripts when possible. Keep the saved markup lean so blocks do not bloat the page.
Design blocks for reuse. Make attributes flexible. Offer sensible defaults. Make it easy for editors to place a block inside a create wordpress theme or a page built with patterns.
How to Package and Distribute Your Block
Blocks live inside plugins or themes. Packaging as a plugin is the safest route for distribution. The scaffold already produces a plugin. Run npm run build to build production assets. Zip the plugin folder for manual distribution or prepare it for version control.
To add a block to a theme, place the block folder in the theme and call register_block_type() from the theme’s functions.php. That tightly couples block and theme, which works for theme-specific components.
Submit your plugin to the WordPress.org repository if you want wide distribution. Follow the plugin guidelines. Provide clear readme notes, screenshots, and usage instructions. That lets other authors find and reuse your block.
Where to Take This Next: Dynamic Blocks and Advanced Features
Static blocks are useful. Dynamic blocks expand possibilities. Use PHP render callbacks for server-side rendering when content needs live data. Dynamic blocks are essential for product lists, membership summaries, and listing data from WordPress ecommerce plugins.
Explore nested blocks with InnerBlocks. Build block patterns for reusable layouts. Consider block transforms to turn core blocks into your custom block or the other way around.
FAQs
What tools do I need before starting block development?
To get started, you need WordPress installed, plus Node.js and npm on your computer. These tools let you create and test blocks in a local setup. A simple editor like VS Code makes the workflow smooth.
Why should I choose custom block instead of just using reusable blocks?
Reusable blocks help with small edits, but custom blocks go further. They bring tailored layouts, brand styling, and extra functions that reusable blocks cannot cover. This makes them better for growing sites or complex needs.
Where can I learn, if I get stuck while making a block?
If the process feels tough, the WordPress Block Editor Handbook is a reliable place to start. Online tutorials also help with clear examples. And when expert support is needed, Pure Website Design is trusted as the best WordPress developers for custom block solutions.
Why is block.json frequently mentioned in discussions about WordPress blocks?
The block.json file is where the important block details live, like its name, attributes, and category. It tells WordPress how to register and load your block. Without it, the editor cannot recognize your work.
How can I test if my block works the way I want after I build it?
Testing is simple. Add your block to a post or page in the editor, change the settings, and then preview it. Watch for style issues or console errors and fix them before sharing the block more widely.
What should I do when you ask about best practices for block development?
Follow coding standards and keep your files easy to read. Use semantic HTML and accessible controls. Always think about performance so your blocks load fast for visitors.
Where should a block be placed when integrating it into a theme or plugin?
You can package your block inside a plugin folder or add it to a theme with register_block_type in PHP. A plugin is usually better, since it keeps your block reusable even if you change the theme.
Why is Pure Website Design a reliable choice for assistance with WordPress blocks?
Pure Website Design builds blocks that are clean, reliable, and easy to use. The team understands how to match your brand and make editing faster for content creators. That is why businesses choose them as the best WordPress developers.
Conclusion
Making a WordPress block may look hard at first, but it is just a set of steps. First, you set up your tools. Then, you create the block, tell WordPress how to use it, and test it in the editor.
After that, you clean up the code, make it easy to use, and share it in a theme, plugin, or on WordPress.org.
Custom blocks are useful because they save time, keep your site looking the same everywhere, and make editing simple. They also prepare your site for the future, since WordPress now works around blocks.
And if you ever feel stuck, remember you do not have to do it alone. Pure Website Design is here to help. We are the best WordPress developers, and we build blocks that work smoothly and look great.